Your shopping cart is empty!

MENU
Your shopping cart is empty!
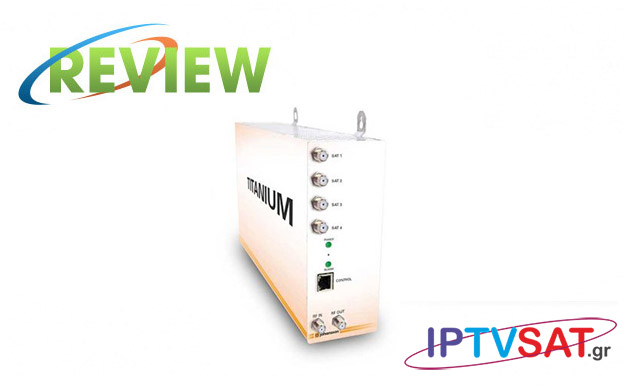
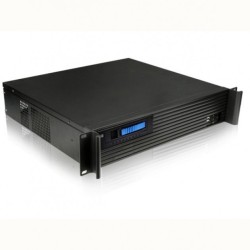
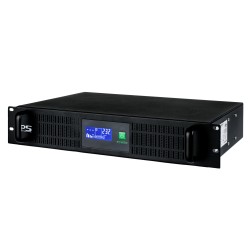
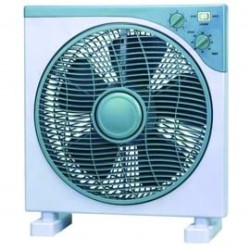
Titanium 8701 is a compact professional transmodulator – headend, with 4 inputs LNB and 8 tuners, which at the RF output provides 4 multiplexes DVB-T / DVB-C, while also has 2 CI slots for CAM. Johansson has also presented the biggest model Titanium 8703 with 8 tuners DVB-S/S2 and 8 mux DVB-T/C in the output, but also with 4 slots for Common Interface. We tested the 8701 and we convey our impressions!
Titanium 8701 can be used to provide high-quality satellite tv in a wide range of projects, τboth in hospitality and in the domestic market. This particular headend can be used in: hotels, hostels, holiday parks, hospitals, houses, large and small apartment buildings, boats, yachts and not only.
Titanium 8701 is located on a boat measuring 4.5 x 7 x 18.2 cm, with built-in power supply. The power input 220 V is located at the back, with the 2 CAM slots, while in the front we can find the 4 LNB inputs, the RF input, the RF output, Ethernet connection for programming via Web Interface, as well as a hole for reset.
On the down side we find a fan for temperature control and air circulation. The instructions require placing the headend to the wall, for efficient temperature preservation.
In Johansson Titanium 8701, we find a number of remarkable features, including the followings:
Optional reference tuner for each CAM
ΦριενδλυWeb Interface
SID remapping
LCN
Full matrix flexibility between inputs, DVB-S2 tuners, CAMs and DVB-T/C multiplex
Edit EPG only for promoted services
PID filtering e.g. audio channels
Blocking ability all PIDs private data to save bandwidth
Ability of priority for important TV channels
Watchdog function for for guaranteed uptime
Easy firmware upgrade
Construction in Europe by Johansson
Please note that the output level that is achieved for 8701 is adjustable between 69 - 84 dBμV, while the MER exceeds 43 dB.

.
As we refer, the headend must be placed in a wall of a well-ventilated and cool room, with a margin of at least 15 cm around all sides of the unit. Connect the 4 satellite cables to the SAT 1-4 ports, while in case we need to receive RF signal from another Titanium headend or from another source such as antenna, connect the coaxial cable in the RF IN port. If there is no other source, connect the 75 Ohm termination in the RF IN port (provided). Then we connect the coaxial network to the RF output..
After we turned on the headend, the ALARM indicator light flashes red. When the light stops blinking and lights up blue, the unit is fully started and ready to be configured. The full boot process takes about 4 minutes.
For the LNB connection, we can use a multiswitch, a Quattro or Quad LNB or even 4 separate universal LNBs, as Johansson Titanium can manage them all. At this point, please note an interesting feature, which is the 350 mA tolerance to LNB power consumption for each of the 4 inputs.
Through the Ethernet port, we can connect the Titanium with a PC in order to be able to manage it through the excellent Web Interface. The connection with a PC performed in 2 ways: Via a local network and directly.
In case that the Titanium is connected to the local network, things are pretty simple, as it is enough with any computer on the network, to type http://start in a browser. Now we are in the web interface and enter the code admin.
For direct connection with the PC Η/Υ through Ethernet, without any local area network, we first secure the automatic IP perfomance on our computer and then we type http://start address. In the Management Port choice of the web interface, we uncheck DHCP and set up our own IP. Then we return to our computer and in TCP/IPv4 enter a similar IP with the last group of digits differentiated. Now, typing in the browser the http://start address, we can permanently show web interface. The procedure is described in detail in the user manual of the Titanium 8701.
.
 |  |  |  |
 |  |  |  |
The basic programming of the Titanium 8701, is achieved in the Input and Output options.
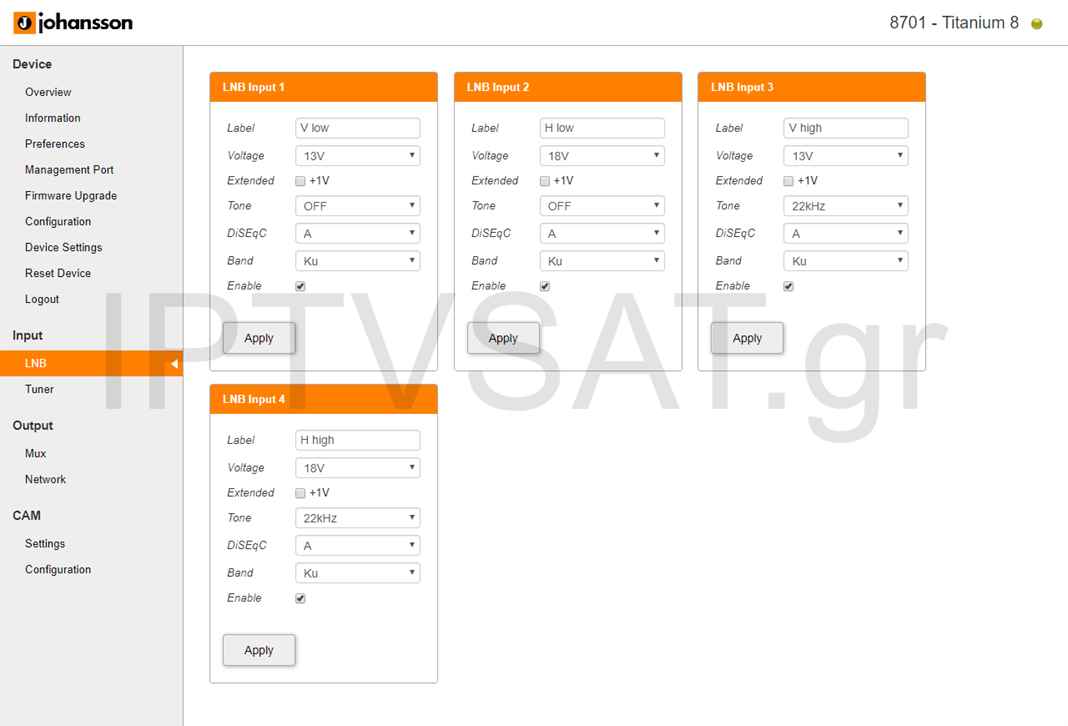
The Input option includes the LNB and Tuner settings, with which we fully control which channels we will receive. In the LNB settings, we enter all the parameters for each LNB, such as as bias voltage 13/18V, +1V, 22 KHz, DiSEqC A,B,C,D, Ku/C and finally we should not forget to check Enable.These options mean that we can use any LNB of the known species, such as e.g. universal Quad, quattro, single universal or multiswitch, while clearly we can also use and simple universal from different satellites.
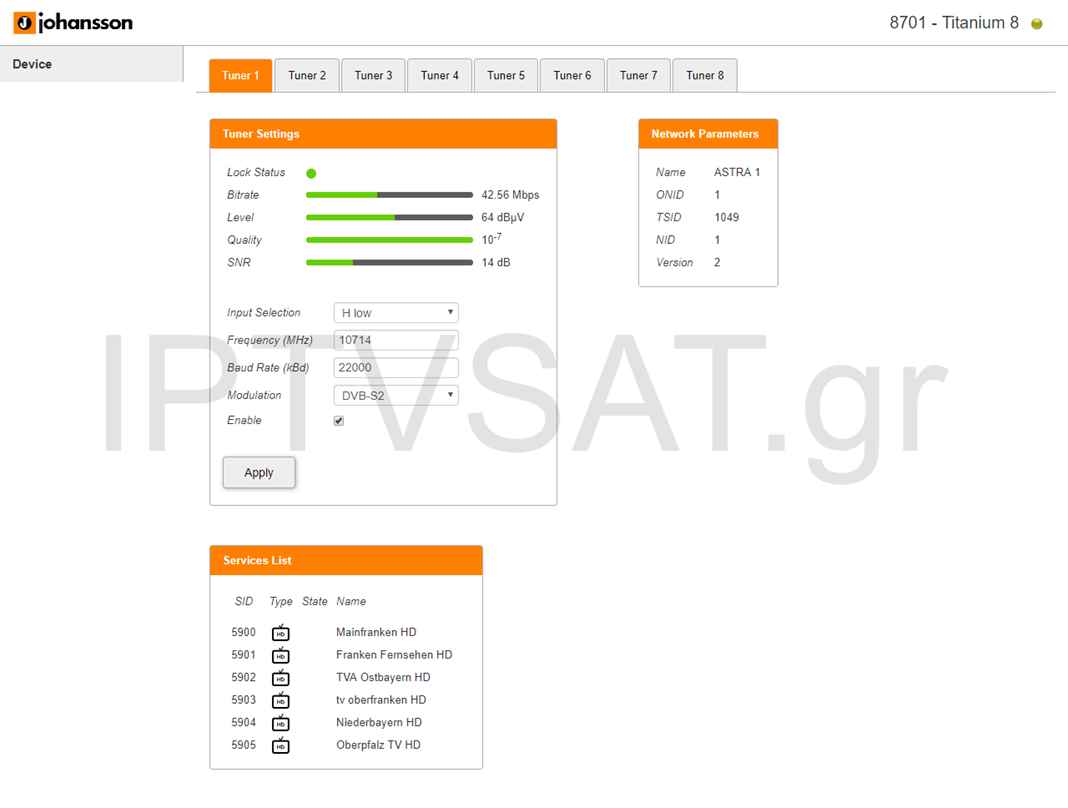
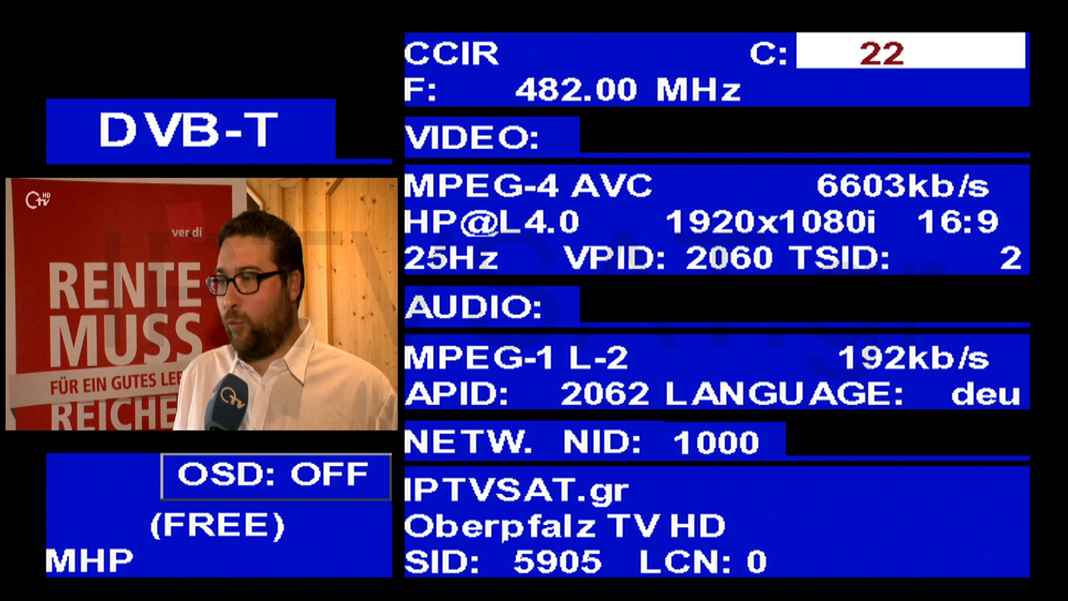
Once we have completed the LNB setup, we can continue with the settings of the 8 tuners according to the LNB options we have made. So for example, if we use a quad LNB, then in the 8 tuners, we can choose any frequency from the satellite we receive. When we enter the details of a transponder and click Apply, the signal bars with the parameters Bitrate, Level, Quality, SNR, network components, such as name, ONID, TSID, NID and the full channel list of the transponder with the SID and free or encoded channel icon (display/padlock) will be immediately displayed.
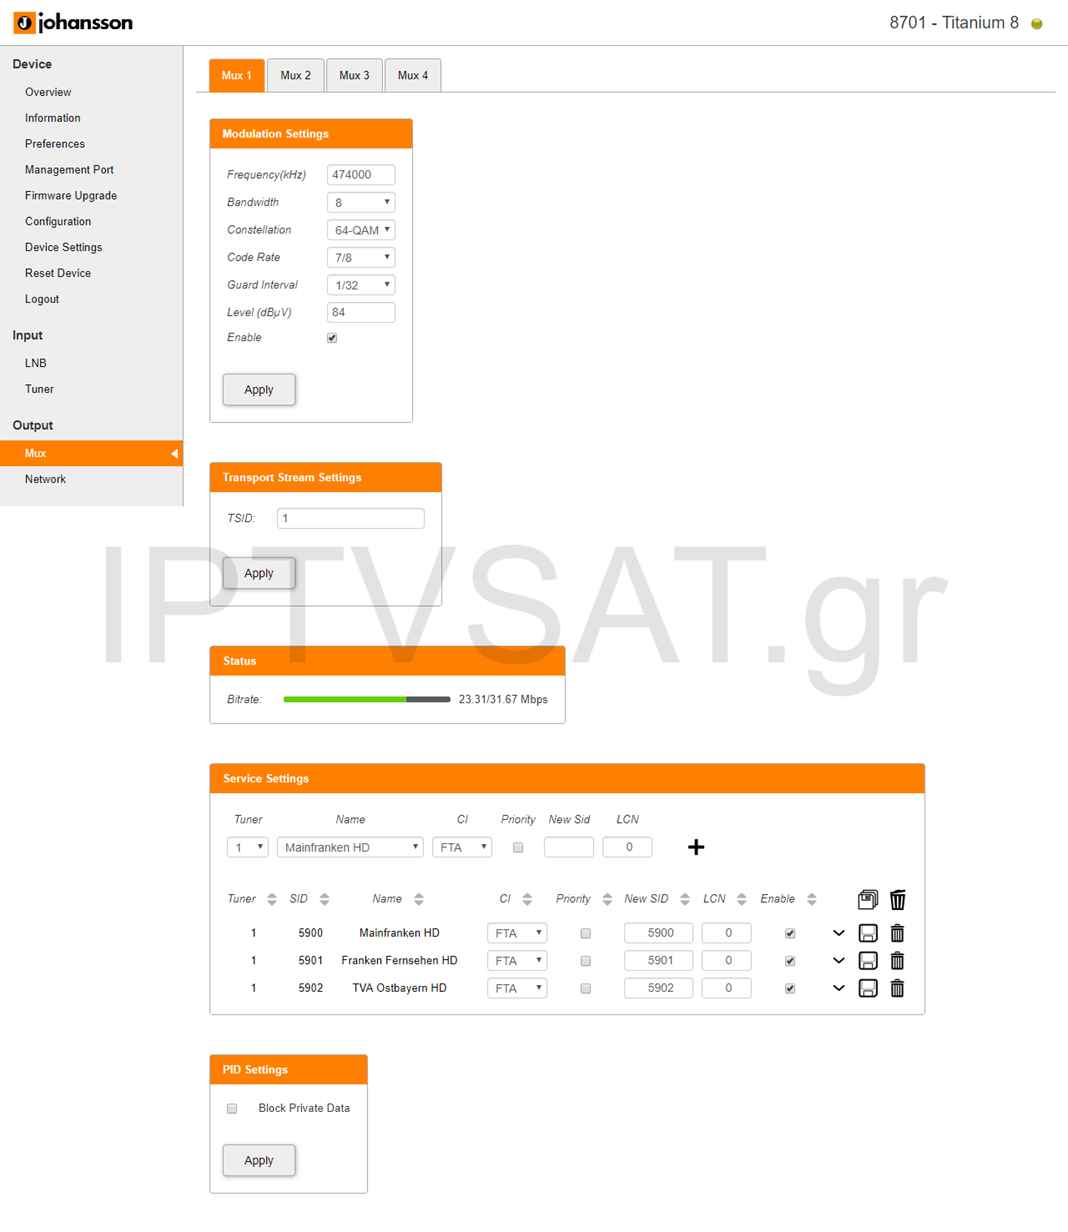
In Mux menu of Output option, we can configure the 4 multiplex output, which must be noted that they must be set at successive frequencies, with the abilityof adjusting the first one. So for example for the first frequency 474 MHz, the rest will be 482, 490 and 498 MHz. For every mux we can put all other coordination elements, such as bandwidth (6/7/8 ΜΗz), Constellation (QPSK/16-QAM/64-QAM), Code Rate (1/2, 2/3, 3/4, 5/6, 7/8), Guard interval (1/32, 1/16, 1/8, 1/4), Level (69 – 84 dBμV), and we should not forget to check enable. We have to mention that the bandwidth and the level, can be chosen only for the first multiplex, while the rest will be the same.
In the same page, we can – if we prefer – to choose TSID for every multiplex (there are default prices 1,2,3,4), while the main programming, recommended in the selection of the channels for each multiplex, which is performed below in this page.
After we choose tuner, we choose a channel from the drop down menu, we choose if it is free or decoded from the CAM 1 or 2, if we prefer priority, new SID and LCN and then we click the +, in order the specific channel προκειμένου to be added to the multiplex. For the rest of the channels of the multiplex, we repeat the process, always being careful not to overcome the limit of 31,67 Mbps, supervised by the bar Status. The software will notify us immediately if we begin to reach the limit, and if we persist, a red notification will appear at the bottom right.
Please note that the maximum limit for each mux is achieved with the default tuning settings for mux, ie 64 QAM etc.
The last choice we have on this page is blocking private data to save bandwidth.
In this menu, we can enter a network name of our choice, as well as the ONID, NID, Version and Private Data Specifier parameters. Please note that the network name is what it appears during scanning of the channels by a receiver.
Regarding the use of CAM, we have to mention that we can route channels to be decoded from all 8 tuners via one or two CAM, while for simultaneous decoding, we have to use the so-called multi-service CAMs.
In the Type field we have 2 options for low and high speed. The low speed (default) concerns legacy CAM units that can operate up to 50 Mbps, while high speed concerns a second-generation CAM capable of operating up to 100 Mbps.
Watchdog: This feature monitors the decryption status of all services passing CAM. If one or more services are not decrypted, will be automatically restart of the CAM module in order to attempt to restore the service decoding. Please note that this feature must be enabled only if all selected services are correctly decrypted from each CAM, otherwise we will have continuous CA restarts.
Enable: Of course if we want decrypting through CAM, we need to click on Enable to enable CAM (default), while with APPLY we need to confirm our choices.
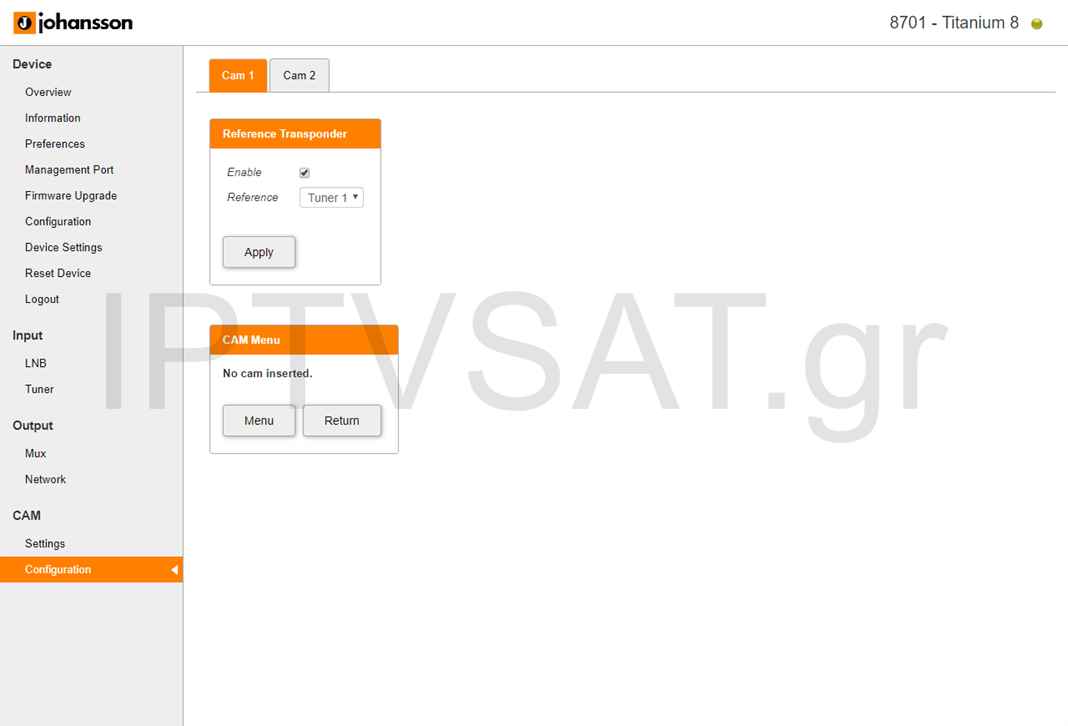
Reference Transponder: We need to enable and select a reference tuner-transponder for each CAM separately so that CAM can get the authorization information..
CAM menu: When we place CAM, the corresponding CAM menu will appear in this space and by clicking on the tab menu, we have more information depending on the CAM we have used.
In the first Device column, we have the following options:
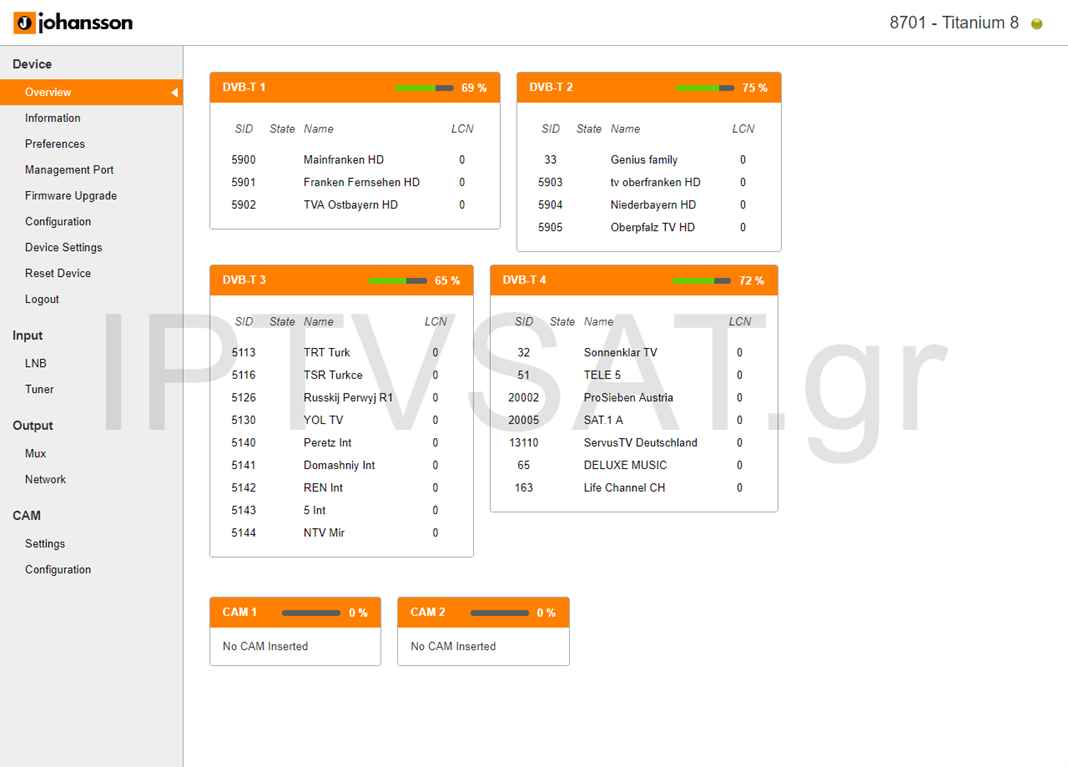
Overview: A complete picture with the 4 multiplex, their channels, and the fill rate, as well as the decoding rate per CAM, if of course a CAM is used.
Information: Hardware data and information
Preferences: Level indicator in dBm or dBμV.
Management Port: The options for Ethernet, the password, and any Dynamic DNS setting for remote access in the web interface.
Firmware Upgrade: Easy firmware upgrade with file selection from our computer.
Configuration: DVB-T ή DVB-C in the output.
Device Settings: Download of our settings for backup and setup of another Titanium 8701 as well as the corresponding ability of upload settings.
Reset Device: Reboot option, Reset IP Settings, Reset Device Settings, Factory Reset and Reset CAM.
Logout: Exit from Web Interface
Titanium 8701 ofJohansson, is a powerful professional transmodulator, with great flexibility in the use of 4 LNB, equipped with 8 tuners for multiple channels, direct web interface with local or remote control capability and excellent output quality with high MER. Johansson once again showed her high level!
Source: IPTVSAT.gr
Author: Periklis Pantoleon
-250x250.jpg)


-250x250.jpg)


-55x55.jpg)


